Monday, December 28, 2009

Canvas Art

I was cleaning up my craft area last week and ran across some little 6x6 inch blank canvases. They've been there for a few years now, just waiting for the right spark of creativity to hit my brain. I have seen how other crafters doll them up with paint and paper and I always think how easy that would be to do. So I started painting, and modge-podging (yes, that's a word I just made up) and came up with these.

Not too shabby for my first attempt.
Good thing you can't see up real close,
cause there are definitely flaws.
Not too hard to do though.
And kinda fun.
I may just have to try a few more...

A&J

Monday, December 21, 2009

Christmas Scavenger Hunt

A totally fun idea for the kiddos to add to the excitement of Christmas is to create your own scavenger hunt. This year, we are going to have one on Christmas Eve. I've created several cute clues like this one.
Of course I had to make it super easy because my participants are itty bitty.
I'm going to have them running all over the house for clues. The last one will lead them to one present that they can open that night. It's going to be matching Christmas pjs and a couple of Christmas books.
Kids are so much fun. I can't wait!

A&J

Zoo Membership for Gift

Need another gift idea. Give the gift of a membership to your local zoo. This is great for families and especially new parents that haven't figured out yet how many times they will be going to the zoo.
Just make a cute tag.
And tie it to a cute little guy like this one.


Something for the whole family to enjoy.

A&J

Christmas Card 2009

As always, we are in search of "THE BEST" Christmas card ideas. There are so many creative people out there, the competition is crazy. Even though we've created our own pressure, it's still something we plan months in advance. I love funny ideas. The funnier the better. Ones that will make you smile or even laugh out loud. Here's a cute and funny idea that we used this year. Hope it makes you smile.

A&J

Sunday, December 20, 2009

Snow Day Bucket

Trying to find the perfect gift for those friends who have EVERYTHING. I made this snow day bucket for a couple of our friends this year.

I found this snowman kit at Gordmans. Added some Starbucks mugs, some hot chocolate, the perfect movie "It's a Wonderful Life," and some movie candy. I did hide some butterscotch rum in the bottom for the parents to spike their hot chocolate. Depends on your recipients of course. The bucket I chose looked so cute with the theme, but it was a tad small. I would have liked to add some gourmet popcorn, but it just wouldn't fit. This was a huge hit anyway.

Now Bring on the Snow!!!

A&J

Saturday, December 19, 2009

Christmas Reindeer Chow

One of my favorite treats with some Christmas color.

Reindeer Chow (aka Puppy Chow when it's not Christmas time) is one of my favorite snacks and is so good you won't be able to stop eating it. I have made the traditional recipe and just added red and green M&M's. This is an easy and great idea to make up and hand out to friends and/or neighbors.


Here's the recipe:

1 stick of butter
1 cup of semi-sweet chocolate chips
1/2 cup peanut butter
8 cups Crispix cereal
2 cups powdered sugar
Christmas M&M's

Melt butter, chocolate chips and peanut butter in the microwave. When melted, pour over Crispix; mix well. Put powdered sugar in large brown paper bag and add the Crispix. Shake until well coated. Add more powdered sugar if needed and shake some more. Add M&M's and you're done!

A&J

Magic Reindeer Food

This is such an easy thing to make and will be a hit with your little ones. It's also very inexpensive to make which makes it a good idea to give to neighbors and friends.

You can find recipes for this just about anywhere, but it's really just Oats and Sprinkles.
Use as much or as little depending on how many you're making it for.

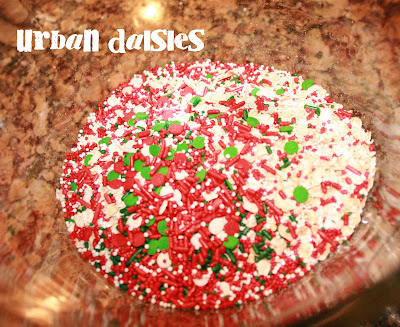
Pile some oats in a bowl, then sprinkle lots of holiday sprinkles on top. I also used the white sparkly sprinkles so that it will "sparkle" in the moonlight, making it easier for the reindeer to see. (you could substitute with some sugar).
Mix it all together and place in little bags. Easy as that!
I got the awesome ready to print labels here. You can download and print.

They have these directions on the back:
"Sprinkle on the lawn at night
the moon will make it sparkle bright
as Santa's reindeer fly and roam
this will guide them to your home"

A&J

Tuesday, November 17, 2009

Animal Print Pumpkins

I'm in love with all the fabric pumpkins that all my favorite bloggers are posting. I've been wanting to make my own to have for both Halloween and Thanksgiving. I even printed the tutorials and shopped for fabric. This is until I found these adorable little beauties at Affair of the Heart in OKC. They are so adorable, I couldn't possibly have come up with anything cuter.
Love, love, LOVE them!!

A&J

Tuesday, October 27, 2009

Spooky Spider Treats

Just in time for Halloween...
I found this super cute idea from here.

These little spider pops are great for small inexpensive
party favors for your little one's Halloween party!

I simply grabbed some black pipe cleaners (cut in half),
and wrapped around the stem of a tootsie pop and
formed spider legs..
{I skipped on adding little googly eyes to each
spider, but if you have the time go ahead
and glue some on!}


A&J

Monday, October 26, 2009

Craft Room

I love looking at how people have their craft rooms organized and how pretty everything is. Let's be honest, not everyone has an extra room in their house just for crafts.
When we moved into our new house several years ago, I had one major request... I wanted a scrapbook/craft area. I do have to double it as a guest room when we have guests though so I don't have a full craft room, but I love it anyway.
Notice we had this really weird shaped window area to work with. If we had put a piece of furniture on that wall it would have totally blocked the window off. So my husband built me a custom work area. I drew out a big long skinny "U" shape plan and he put it all together. I slapped a coat of white paint on it all, and that was that!
Nope it's not as fancy as some of these very custom rooms, but it is perfect for me and what I use it for. {And a heck of a lot more inexpensive I'm sure!}

See this really weird shape we had to work with?
I have my sewing machine setup on one end which is super handy to not have to pack up when it's not being used.

The desk was made out of plywood and trimed out with 2x4's all the way around. The legs are also from the hardware store, just premade legs. All of the shelving is premade as well. We bought the 12" closet shelving, premade wooden brackets and finished out underneath
with more 2x4's for support. Notice, my work area is pretty narrow. I think it's only about 28" deep, so I've tried to use as much wall storage as possible.

These ribbon jars are not only functional but pretty as well. I needed an easy way to store all my ribbon where I could see what I have. I just bought a case of mason jars from the grocery store, and spray painted the lid silver. {Note: I left the middle circle out of the lid and just screwed the rim on the jar. So it looks like there are lids, but there really aren't. Makes it alot easier just to grab what you need.}


More pictures of the storage. Black photo storage boxes, baskets, and magazine holders for all my idea books.

This utensil holder was something that my husband made as well and I had gotten the idea from a magazine. It was just 2 2x4's made into a "T". He cut out 4 circles and I bought some inexpensive glasses to drop in. Very handy to have everything right there in front of you while your working, but off the table and out of the way.

More storage solutions... I found these silver salt shakers at the Dollar Store one day. Took the lids off and used them for storage.

Look everywhere for things you can use!

This is one of my bulletin boards in the room. I have several sets of stamps. And unless you have them out everyday it's hard to remember what you even have. Most of these were bought from Stampin' Up so I made a copy of the sets I have out of their catalog and posted them on my bulletin board and now I know exactly what all I have stored away!

This little cabinet was a garage sale find by my Mom. It was originally just an old wooden box used for spices. She grabbed it for a dime and gave it to me and said you can find something to do with this. And, yes I did.

I turned it on it's side, added a small little shelf inside, and a black drawer knob on the outside. Painted it all white and hung it on the wall. It's perfect for all of my "little" storage, like ink pads misc stamps, paint, etc. {Like I said, look everywhere for things you can use for creative storage.}
This is back in the corner of the desk. I have enough room to keep my cutting mat out which was another important thing for me.

And there you have it. A peek inside my Craft Area. {I'll be honest and say that it doesn't always look as tidy as this. And really, if it did then no one would ever believe that I actually use it. :) }


So what do your craft areas look like? Are there things that you love that you just can't live without?

A&J

Tuesday, October 20, 2009

Fall decorations...

I love decorating for fall. All of the colors are so warm
and inviting. It just makes me want to light a fire and
cuddle up in my pj pants.
Maybe read a book and take a nap.

Then I wake up from my daydream to break up
a fight between the kids and holler at the
dog to quit barking at the wind again...
One of these days though.
Anyway....

Most of theses decorations are from my favorite
craft store Hobby Lobby.

The top left is a shot of my fireplace mantel.  It has alot going on with the rock already so I just put a simple fall berry garland across and a few little pumpkins.  The black crow was a clearance find, but had totally ugly navy ribbon on it so I switched it to black and orange.  Seriously, since when did black and navy become a pair again??

The scarecrow was put up in our TV console by my 4 yr old.  Looked just as good as anything I could do with it so it stayed.

The white pumpkin is artificial and I just added "Boo" with a sharpe marker. {I just might have kinda copied by partner-n-crime "A" on this one. :-) } I plan to just turn it around after Halloween and just have a white pumpkin for fall.

The candy jar I filled with Halloween m&m's and printed one of these neat bottle labels and used double sticky tape to stick it on. {My favorite new thing this year.}

And that's all folks.
Happy Fall Ya'll!!

A&J

Tuesday, October 13, 2009

Halloween Costume - Tutu Witch


Need a super cute & unique witch costume for Halloween?
This one is simple to make and inexpensive!

{I wish I had a cute little model to show off how darling
 this actually looks on, but my little boy just wasn't up to the task -  
I even bribed him with candy and that didn't work.
Poor thing, guess I can't blame him....}

You'll need some ribbon, elastic, and at least two rolls of tulle (6 inches wide).

Elastic was cut about 16 inches long, and ribbon on each side was cut about 26 inches long. (these can be longer or shorter depending on how big you are making this.)
I stitched the ribbon on to each side of the elastic.

I sewed a third piece of ribbon that was cut about 50 inches to the middle in a "V". This will be the halter straps.


Then just cut strips of tulle for the tutu. They will need to be double the length you want it to be because you will fold them in half and tie onto the elastic. I tied two pieces together at a time.

Add a strip of green ribbon around the waist and safety pin a flower in the middle of the neckline.
(All of the ribbon just ties in a bow in the back)


All you need to finish the costume is a witch hat, and some striped leggings or tights!


A&J

Superhero Cape

A superhero cape for those rowdy little boys (or girls)!
This one was for Mr. Davis, so it has a "D" on it.

Instructions: (Keep in mind that this can be made any size at all. I made this one 22 inches wide by 26 inches long.)

Take 1 yard of fabric and cut two pieces similar to the shape above. Applique your letter or other "super" shape on one piece. Put right sides together and sew along the edges leaving a small opening to turn it right side out. Then iron all of your seams flat and make a final stitch all along the outside edges of the cape. To finish it off, sew velcro tabs to the neck of the cape.... and it's done!

A&J

I LOVE Halloween....

I LOVE Halloween....
Halloween has to be my favorite holiday. I love decorating the house and getting treat bags ready. Halloween parties and designing costumes.
Since my independent little ones had their own say in costumes this year, of which were store bought, I'm spending my energy on decorating.
I love all you creative people out there and am in awe at all your delicious little blogs full of all the cutest ideas. See my version of the white boo pumpkins. It's everywhere, so of course I had to try it out myself. My new fav item of the year. Hobby Lobby has these feathered topiary trees that are also a new fav of mine. And no Halloween is complete without a giant spider and her web to greet you in the entryway. We call her Charlotte because we are creative like that.
The front porch is my next project.
Happy Halloween All!!!

A&J

Monday, October 12, 2009

Adorable Hat

Check out this most adorable hat I found on Etsy this weekend. Love it!!! Can you say fall photo op? Kathyneilsen is the genius maker. Of course I ordered 2. The girls will look so cute. Especially with their matching pea coats I bought from Target. CUTE!!!

A&J

Thursday, October 8, 2009

Halloween Candy Necklace

Here is a different take on candy necklace. I made this for my son's preschool class for little party favors for their Halloween Party. They turned out so cute and very easy to do!


I grabbed a roll of clear cellophane from the craft store and cut about 6 inch wide strips. Place you choice of candy, treats or other goodies in the cellophane. Then just wrap it up and tie each section off with some ribbon.
I used:
little bags of pretzels
nerds
fruit snacks
a Halloween stamp ($1 spot at Target)
eyeball gumballs
& of course some candy corn packets.
You can use anything!
(Note: you may need to use two strips of cellophane for each necklace to make it long enough. Just overlap them in between one of the sections)

A&J

Sunday, October 4, 2009

My Favorite Blog...


I read all of her posts.
Some of them make me smile.
Some of them make me cry.
Some of them inspire me to get a little more crafty.
Some of them inspire me to try something new.
Her witty humor makes me laugh.
So sometimes I even re-read them.
Then I laugh again.
And sometimes I even call my friend (A) that
works down the hall and tell her she
needs to read it as well.
Sometimes we get to laughing so hard that
I almost fall out of my chair.

It’s the little things in life.
Julie, you rock!
And if you happen upon here,
we heart you!
Keep the posts a comin’!

J

Friday, September 25, 2009

Denim Sunflower Tutu Dress

Isn't this the sweetest thing you've ever seen? I know...I know, I'm so biased. But I just can't help it. This little dress is so fun to make.

I took an Old Navy denim overall dress and cut the skirt off just under the belt loops. Then I made a yellow and white tutu. Tutu tutorials can be found all over the web. Just google and find one that's easy for you to follow. I did add ribbon into my tutu to make it even cuter. Then I simply stitched the tutu to the inside of the top. I added ribbon through the belt loops and tied in a bow. I found these cute sunflower pins at Claires. Bought two to add one to the front pocket and one to put in her hair.

Here's the front.
Here's the back

A&J

Bandana Dresses Part 2

Another spin on these adorable bandanna dresses. These straps are a little different. For example, these straps are sewn to the front and tied in the back.
Front
I love this version because you can tie a big fancy bow in the back.
Back
I added a little bit of fancy embellishment to the front. I would like to give you the impression that I have such neat ideas and that I thought to just add this to make it look that much cuter, but what really happened was I hate reading directions and so I didn't and messed up my stitching when I sewed the ribbon to the front. I didn't make a fancy Z pattern as suggested in the directions. Nope, I just sewed crazy lines back and forth and back and forth and it looked hideous. So, I ran to my favorite store Hobby Lobby and purchased this life saving rose ribbon. Sewed it right on and voila, covered up my very ugly zig zag pattern that I'm infamous for. Turns out, I love this added feature and purchased more to added to all my other ones I plan to make in the future.
I couldn't resist making this red one with zebra ribbon. Isn't animal print so fabulous.

A&J


Thursday, September 24, 2009

Ultimate Movie Night Gift Basket

Need a quick and easy universal gift idea that's perfect for any age? Try an Ultimate Movie Night Basket. You can modify this gift to fit any age from Disney movies for the itty bitty ones, or old time movie classics for the great big oldie ones.
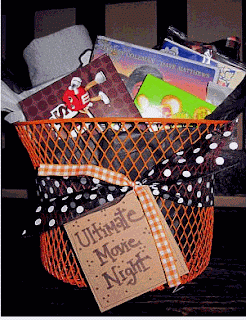
Start with a basket of your choice. This little masterpiece is for an avid OSU fan so I selected an orange basket.
Add some super comfy PJ's.
Select the perfect movies. This little guy (I still think he's little, but he's actually 10) has every current movie imaginable. So I selected some age appropriate classics that every kid needs to see.
Some tasty movie candy.
Of course movie popcorn. I didn't have much time, but I usually find bags of caramel popcorn, but microwave works great too when you are in a hurry.
Add some tissue paper, cute ribbon, and a fancy card and you are done with your very own Ultimate Movie Night present.
What's so great about this is you can get creative as you want. I've done a scaled down version for teacher gifts as well. Sometimes if you don't know PJ sizes, you could add a soft blanket, or if you can't decide on what movies, put in movie theater tickets. The possibilities are endless.
Let us know if you have other cute possibilities. We love hearing new ideas we can use.
Have fun!!

A&J


Related Posts with Thumbnails